



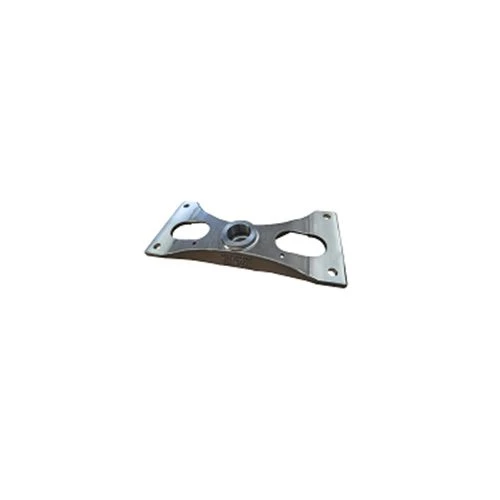
Truck Tow Hook Water Glass Casting
A truck towing hook relates to the field of heavy vehicles and includes a tow bar and a hook. The hook is installed on the tow bar. An elastic anti-detachment piece is installed on the tow bar. The elastic anti-detachment piece is configured to match the tip of the hook. card position structure.
Product Introduction
|
Truck tow hook water glass casting |
|||||||
|
Item |
Material |
Production Process |
Sintering Temperature |
Mold |
Custom |
||
|
Truck tow hook |
X2CrNi189 |
Investment casting |
1380℃ |
To be customized |
Yes |
||
|
Available Materials |
Carbon Steel, Alloy Steel, Aluminum Alloy, Low Carbon Stainless Steel, Titanium Alloy (Ti, TC4), Copper Alloy, Superalloy (718, 713) |
||||||
|
Smoothness |
Dimensional accuracy |
Product density |
Appearance treatment |
Appropriate weight |
|||
|
Roughness Ra1-5μm |
(±0.1%~±0.5%) |
7.3-7.6/CM³ |
According to customer requirements |
0.03g~400gg |
|||
A truck towing hook relates to the field of heavy vehicles and includes a tow bar and a hook. The hook is installed on the tow bar. An elastic anti-detachment piece is installed on the tow bar. The elastic anti-detachment piece is configured to match the tip of the hook. card position structure. The elastic anti-unhooking part can effectively prevent unhooking. The elastic anti-detachment piece is provided with a locking structure that matches the tip of the hook, which can position the tip of the hook and reduce the wear or extrusion of the spring piece during the traction process, thereby reducing the durability of the spring piece. And prevent the hook from accidentally detaching from the elastic anti-hook piece during the pulling process. The Truck tow hook water glass casting has a simple structure, strong practicability and good market promotion value.
Make A Wax Model
1. The mold used to press the wax mold should meet the drawing requirements of the product and be used after passing the inspection.
2. The wax material should be formulated according to the ratio of paraffin wax: stearic acid 1:1. After melting, add wax chips and mechanically stir it into a paste. Add it to the wax pressing machine and inject wax into the mold.
3. The wax model must be kept under pressure and cooled in the mold before the mold can be removed. The deformed wax model must be corrected in time and cooled in cold water. After complete cooling, the burrs can be removed and trimmed.
4. After the repaired wax mold passes the inspection, clean the surface grease before welding it with the pouring and riser.
5. After assembling and welding the module, it is necessary to clean the wax chips inside and outside before sending it to the shell for coating and hanging.
Making Shell
1. Material selection: Use 320-mesh zircon powder for the surface layer slurry, use high-aluminum powder or coke powder and quartz powder of 200-mesh or more for the reinforcement layer slurry, use a modulus of 3.1~3.4 for the binder, and a density of 1.30~ 1.40 of 40# water glass.
2. Sand selection: Use 80 to 100 mesh brown corundum for the surface layer, 40 to 70 mesh quartz sand for the second layer, 20 to 40 mesh quartz sand for the third layer, and 10 to 20 mesh quartz sand for the fourth and subsequent layers.
3. Preparation of slurry: Surface layer and second layer: Dilute water glass with water to a density of 1.28~1.30, then add zircon powder, the ratio is 1:1.1~1.2 (note that the ratio should be adjusted according to temperature changes), and proceed Stir mechanically, then add 0.05% cleaning agent and 0.05% defoaming agent, continue stirring for no less than 6 hours, let it stand for 4 hours to mature, and stir evenly before use. The three-layer transition layer uses water glass with a density of 1.30~1.32 plus high aluminum powder and quartz powder, with a ratio of 1:0.5:0.5. The reinforcement layer is the same as the three layers, but the proportion is slightly thicker.
4. The viscosity of the slurry is measured with a 100Ml flow cup. The time for the surface layer, the second layer and the third layer is 28 to 35 seconds, and the time for the reinforcement layer is 45 to 50 seconds.
5. Hanging slurry: Immerse the qualified module into the evenly stirred slurry, move it up and down twice, and then lift it out. Use a brush to puncture the bubbles in the words and dead corners and brush the slurry, and brush away the excess slurry. The whole module needs to be evenly hung with no omissions and five layers of slurry, and then sand can be hung. The entire slurry hanging process should not be too long to avoid natural hardening of the surface and failure to hang sand.
6. Spread sand: The sand should be spread quickly to avoid dripping and accumulation of slurry. The sand should be spread evenly without gaps. The sand-spreading module should be placed in a ventilated place to dry naturally and then put into ammonium chloride solution to harden. After layering, it can be directly put into ammonium chloride solution to harden without natural air drying and hardening.
7. Hardening: The surface layer is hardened for 15 minutes, the second and third layers are hardened for 15 to 20 minutes, and the reinforcement layer is hardened for 40 to 60 minutes.
8. Air drying: Operate as appropriate according to the actual situation, and control the principle of "not wet and not white".
9. When the module is hardening, attention should be paid to deflating and turning it over to ensure that every part of the module is fully hardened.
10. Preparation of hardener: Use industrial ammonium chloride with a purity of more than 95% and add water to prepare the ammonium chloride solution. The concentration of the ammonium chloride solution is 22~28%, the pH value is not greater than 7.5, and the temperature is required to be 15~25°C. Try to keep it at 10 in winter. Above ℃, when the hardener solution is used for a long time and the concentration decreases, ammonium chloride should be added in time to increase the concentration. When the pH value is greater than 7.5, concentrated hydrochloric acid should be added for adjustment.
Dewaxing
1. The coated module can be dewaxed after being parked for three to four hours.
2. Clean the debris at the gate of the module and put it into the dewaxing frame. When the temperature of the dewaxing water rises to 90°C, drop the frame into the dewaxing kettle. Note that the dewaxing frame should be about 100mm away from the bottom of the tank. , then close the air valve and keep the water temperature at 90~95°C to prevent the water from boiling and rolling and bringing debris into the mold cavity. In order to supplement the hardening of the mold shell during the dewaxing process, an appropriate amount of chlorine must be added to the water. ammonium.
3. When the wax no longer floats upward at the gate of the mold shell, lift the dewaxing frame from the water surface, quickly pour out the water in the mold cavity by hand, and then place the mold shell upside down on a clean floor.
Roasting
1. The wax-free mold shell should be left to dry for 4 to 6 hours before being fired in the kiln.
2. When baking the mold shell, place the gate downward, first bake at a low temperature, and then bake at a higher temperature. The temperature should be controlled at 800~850℃ and kept for 1~2 hours. When the furnace is cooled to below 500℃, you can leave the kiln and wait for pouring. The mold shell has the greatest strength at 400°C, so attention should be paid to observation and control during pouring.
3. During the transportation of the mold shell, keep the gate downward to prevent sand or other foreign matter from falling into the mold cavity and causing defects such as sand inclusion.
Detection Systems

Copper Silica Sol Investment Casting



Send Inquiry
